Mounting the photo on porcelain to the monument(glue)
Memory can be fleeting, and even the smallest photograph is able to keep the moments closest to your heart for longer. Mounting a photo on a memorial porcelain is a subtle way to immortalize loved ones who unfortunately are no longer among us. Below we suggest how to perform the entire process so that the final result meets your expectations.
Photos on porcelain - mounting on a monument using glue
To successfully mount a photo on porcelain you will need several accessories. Start by preparing a special silicone-based adhesive (available in our store)- ordinary adhesives may prove insufficient in the face of external factors (such as precipitation), not to mention the risk of damaging the surface of the monument. You will also need a degreasing wipe (or other agent of similar effect), and, of course, a photograph in the format of your choice, ordered from our store.
You are only a few steps away from the correct installation of the porcelain photo on the monument:
1. clean the surface of dirt, dust and grease - a properly cleaned stone is a prerequisite for strong bonding of the adhesive,

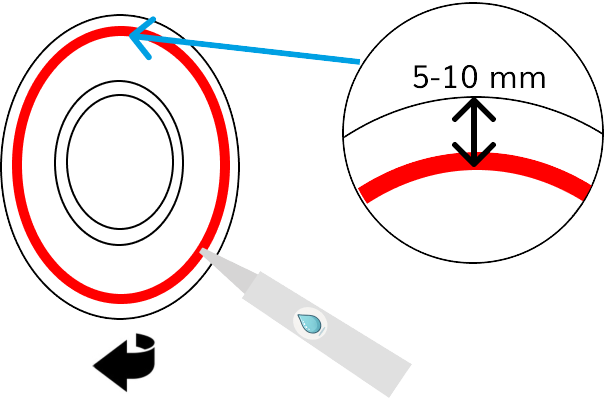
2. apply a layer of glue to the back of the photo - apply one layer about half a centimeter from the edge, and the other closer to the center, paying attention to the continuity of the joint,

3. apply the photograph to the desired location and press firmly - avoid gaps and unevenness,
4. remove excess glue that leaked out after pressing - for this purpose an ordinary dry cloth will work,
5. let it dry - the silicone begins to set after just 5 minutes after application, and it takes about 24 hours to fully dry. You can apply tape for this time so that the porcelain does not come off.

We invite you to check our offer!
You already know how to make the correct installation of a photo on porcelain for a monument. Among our proposals you will find a whole range of formats, sizes and variants of finishing of this type of photography - register on our site to order your own unique realizations. We also encourage you to check the other entries available on our site, and if you have any questions - contact our advisors.
|
Instructions for assembling a photo on porcelain Format: pdf Size: 234kB |
|
| Download " |


